Positioning Objects
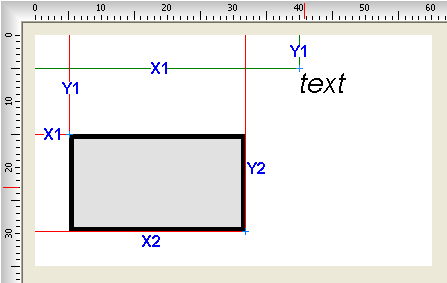
In Label Mix the position
of objects inserted
on a
label is determined by the coordinates of one or two points of
insertion. Text, Compound Text, PolyText, Barcode and Symbol objects use one
point,
while Rectangle, Lines, Image and Paragraph objects
use two
points. In the design editor, the origin of coordinates is at the top
left.
Inserting an object
After we have selected the necessary object (either from the main menu
Objects item or from the
toolbar), we then move the mouse cursor over to the label
and left-click the mouse to insert the object on the label. We release
the mouse and then click Reset icon  to reset the mouse
cursor to normal or default state.
to reset the mouse
cursor to normal or default state.
Positioning an object
Once an object has been inserted, its position can be changed. In Label Mix there are several ways you
can handle the process of positioning an object.
1.
By selecting the object and moving/dragging it with the mouse to the
necessary position.
2. By using
the Object Properties Inspector
to directly modify the value of the object's coordinates.
3.
By using Hot keys on keyboard.
Selected object(s)
can
be moved left, right, up and down by holding down the
CTRL and the
necessary arrow key. Thus:
CTRL+
Left arrow - move the object(s) left.
CTRL+
Right arrow - move the object(s)
right.
CTRL+
Up arrow - move the object(s) up.
CTRL+
Down arrow - move the object(s) down.
Selected object(s)
can also be re-sized (modify width and height) by holding
SHIFT and
the necessary arrow key.
4.
By using object alignment functions accessible via the
Edit and
Objects menu items.
For predictable results, object alignment functions should be used in
combination with
Alignment
Lines
5.
By using a
Layout object as container for
other objects.
Generally, a
Layout object
acts as parent element for other objects. When you draw (insert)
objects on a
Layout object,
you can align the objects in reference to the
Layout cell boundaries.
Positioning multiple objects
The task of positioning multiple objects is similar to positioning a
single object, except that it entails selecting
several objects at once. In addition, Label Mix is equipped with
collection of functions aimed at positioning multiple objects in
reference to one another. These functions are accessible via the
toolbar and also via the main menu.
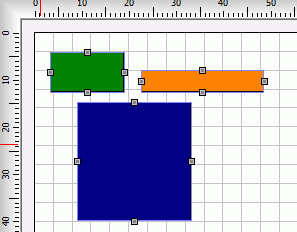
Using the picture, icons from left to right:
1. Resize selected objects to equal
heights
2. Resize selected objects to equal widths
3. Equally space selected objects horizontally
4. Equally space selected objects vertically
5. Align selected object(s) to the first object top position
6. Align selected object(s) to the first object bottom position
7. Align selected object(s) to the first object left position
8. Align selected object(s) to the first object right position
Before
1. Resize selected objects to equal heights |
After
1. Resize selected objects to equal heights |
Before
2. Resize selected objects to equal widths |
After
2. Resize selected objects to equal widths |
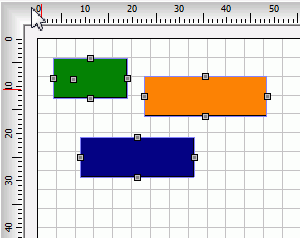
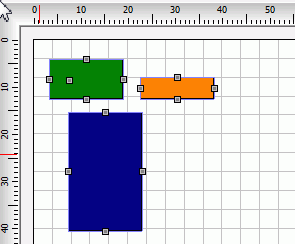
Before
7. Align selected object(s) to
the first object left position |
After
7. Align selected object(s) to
the first object left position |
Additional
visual aids for aligning objects
Label
Mix provides
additional visual aids, aimed at easing the task of positioning
objects on the label. The tools include:
|
Hints:
- Use the Options|Designer
Properties... menu item to set fixed preferences
- Use the View|Editors Properties...
menu item to set temporary preferences |
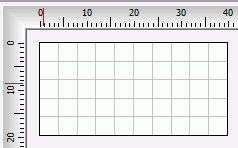
Grid
Series of equally spaced points or lines drawn
horizontally and vertically across the label's background.
Grid line color, space between the lines and other properties can be
set at Options|Designer
Properties...
You can also enable (Snap
to grid) option so
that insertion or re-positioning of objects conforms (clips) to the
grid points/lines. |
| |
| Rulers Designer editor
horizontal and vertical rulers. If enabled, size of the object and its
position
will be displayed on rulers' scales. Rulers make objects re-sizing,
alignment and positioning easier. |
| |
| Reference lines |
|
Layout object A Layout
object acts as
container for other objects, for organizing them into columns and rows.
When you insert an object into the cell of a Layout object, you can align the
object within the cell by using the position and margin properties of
the inserted object.
Position will adjust the position of selected (inserted) object in
relation to the current cell (column-row, where the objected is
inserted). The margin property will handle the padding of the object.
see also: how
to draw/insert Layout object |
| |
| Object Alignment Lines |
Horizontal and Vertical lines can be used to align selected
objects in reference to the lines. To display object alignment lines,
you need to enable Show Alignment Lines property in the
designer Options
and Settings page.
You can also choose between fixed and adjustable Alignment Lines
by disabling/enabling If
we mark the box Adjust Alignment Lines property in the
designer Options
and Settings page. If enabled, small markers will be additionally
displayed on the design editor rulers. Drag the marker(s) to adjust the
lines.
To align an object in reference to the Object Alignment Lines, select
the object and then click the necessary alignment among the menu items:
Align right, left, top or bottom.
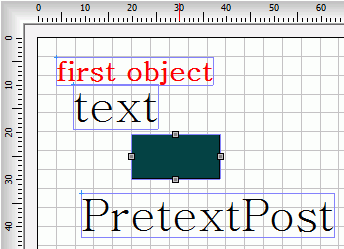
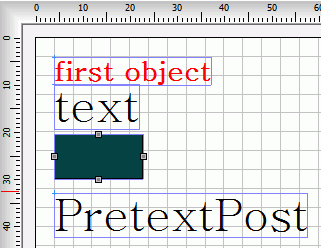
In the picture,
ZIP object has been
aligned right to the Object Alignment Lines
Street - aligned bottom
Country - aligned left.
Notice also that size (width and height) of the Street (selected) object is
additionally displayed on the horizontal and vertical rulers
respectively.
Hints:
You can also align multiple objects using the steps described above.
You need to first select
the objects
to align. |