 Using
and Customizing Tables. How to...
Apart from navigating, inserting,
editing, deleting, creating and using tables' data for designing your
labels, database tables can
also be
customized
to meet your individual preferences, set how the
data in the table is displayed, hide or
make columns visible, resize the column
width, re-arrange the columns order of
appearance, specify table background
color, text and
column title
colors and fonts (setting
options and preferences)
The following topics provide basic information about working
with tables and customizing their visual properties.

How
To Create a New Table
Label Mix is a multi-purpose
software. Tables created in
"My
Database" section of the program can be used to store and manage
practically all types of information - over 1000 database solutions
for business, office, school, and home.
There
is no limit to the number of tables you can create and there is no
limit to the amount of records you can store in the tables.
Before creating a table, you should determine three vital aspects:
1.
The name of the table. This
should be unique in the database and reflect the nature of information
you want to store in the table, e.g. "contacts".
2. How many fields
(columns) you want to
have in the new table, and the names of the columns - which should
reflect information to be stored in the column.
3. The type of data each column will hold -
field type.
You can now proceed to create your new table, using one of three
methods:
Method1.
From the main menu bar, select
My
Database.
From the
resulting context menu, under
Manage
Table, select and click
New
Table sub-menu item.
Method2.
Focus your mouse on the table grid and right-click the mouse.
From the resulting context menu,
under
Manage Table,
select and click
New Table
sub-menu item.
Method3.
From the left menu panel, click
Tables
and then
New Table.
Regardless of the method you use, a dialog box will pop-up.
Enter the name
* of
the new table in the box and then click
"OK".
A new table will be created with one unique field (column) named
"ID", an index field.
If necessary you can proceed to add more fields (columns) to the
table.
* Name of
the table should contain only Latin alphabets (A-Z) or combination of
alphabets and numbers, without spaces or exotic characters. Table name
must be unique in the database, i.e. you can not have two tables with
the same name in a database.
How
To Add New Fields (Columns) to a Table
By
default, when you create a new table, you will be prompted with a
dialog to add new fields (columns) to the new table. Nevertheless, you
can add new fields (columns) to a table at any time - during creation
or after you have created the table.
To add new fields (columns) to a table do the following:
1.
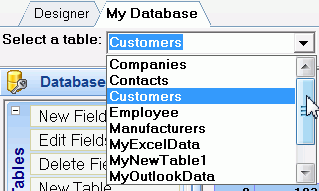
Select the table from the list
 2.
2. Focus your mouse on the
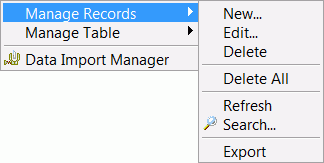
table grid and right-click the mouse.
From
the resulting context menu, under
Manage
Table, select and click
New
Fields sub-menu item.
 3.
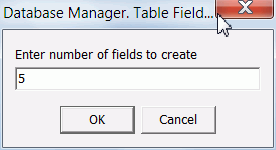
3. In dialog box, enter the
number of fields (columns) you want to add and then click
"OK".
 4.
4. In the resulting
Database Manager page, enter the
field types, field names and sizes.
Follow other instructions on the page.
How
to hide/show table columns
1. From
the menu or
section
workspace,
locate the table
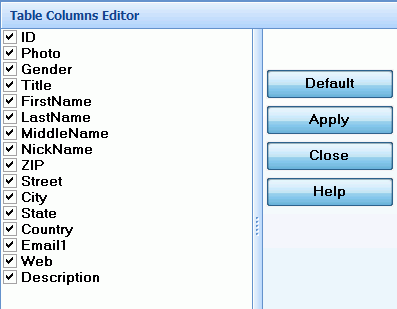
2. Invoke the Columns editor by
double-clicking
the columns editor icon  or choose "Columns..." from the main menu or context menu
(context
menu can be displayed by mouse right-click)
3. Wait for the columns editor
list to
appear. The available columns in the selected table will be listed in
the
editor list.
4. The order in which columns
appear in
the Columns editor is the same as the order the columns appear in the
table
5. The number of boxes in the
Columns editor
corresponds to the number of columns available in the selected table.
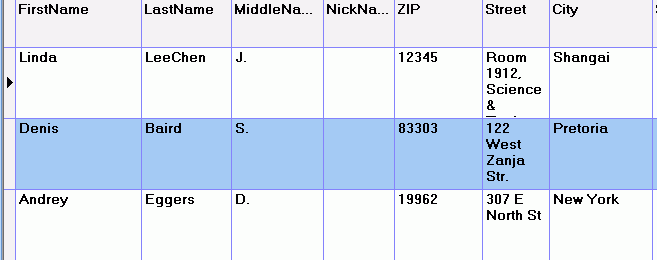
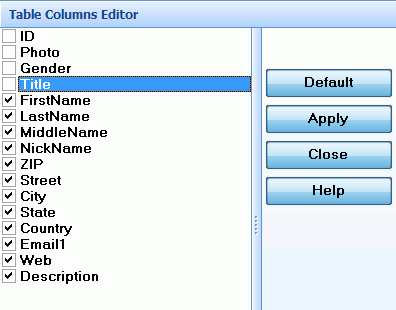
The
checked boxes represent visible columns, while boxes representing
hidden
columns are not checked.
6. To hide a column, uncheck the
appropriate
checkbox in the columns list editor. Conversely, to make a column
visible,
check the corresponding box in the list.
7. Click "Apply" to
save changes, "Default"
to cancel and "Close" to exit.
Before
changing
columns visibility
|

|
|
After changing
columns visibility
|
|
|
How
to re-arrange columns order of appearance
1. From the menu or section
workspace,
locate the table
2. Invoke the Columns editor by
double-clicking
the columns editor icon  or choose "Columns..." from the main menu or context menu
(context
menu can be displayed by mouse right-click)
3. Wait for the columns editor
list to
appear. The available columns in the selected table will be listed in
the
editor list.
4. The order in which columns
appear in
the Columns editor is the same as the order the columns appear in the
table
5. The number of boxes in the
Columns editor
corresponds to the number of columns available in the selected table.
The
checked boxes represent visible columns, while boxes representing
hidden
columns are not checked
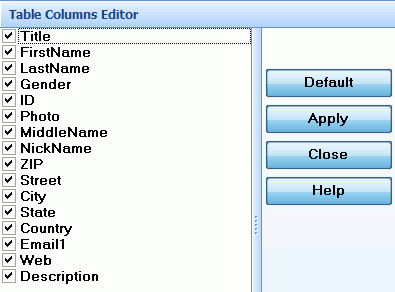
6. Select the column in the
Columns list
box
7. Drag it to a new
location in the
list box
8. Click "Apply" to
save changes, "Default"
to cancel and "Close" to exit
Note:
You can also change the column order
by
clicking on the column title and dragging the column to
a
new position (drag-and-drop)
Before changing
columns order of
appearance
|

|

|
After changing
columns order of
appearance
|

|
|
How
to resize column width
To resize the column width, focus
your
mouse cursor (or pointing device) on the
gridline between the
column
titles. Your mouse cursor changes to HorizontalSplit. Drag the
line to the new position (left or right).
CustNo field (column) Before
column resize
|
After
column resize
|

|

|
How
to sort records in the table
Focus
your
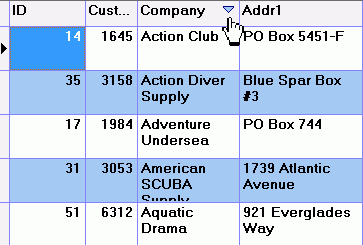
mouse cursor (or pointing device) on the necessary column title (your
mouse cursor changes to HandPoint). Click the title. Records in the
table can be sorted in
numerical or/and alphabetical (0-9 or 9-0, A-Z or Z-A) order.
Company field (column) sorted
A-Z
|
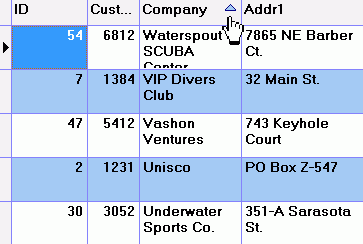
Company field (column) sorted
Z-A
|
How
to Add record to the table
To add record, click the "Add..." item in the menu. A form
will pop-up, where you can add necessary
information. Alternatively, you can click the "Add..." button.
How
to Edit record in the table
To edit record in the table,
double-click
on the table. A form will pop-up, where you can edit necessary
information.
Alternatively, you can click the
"Edit..." button.
You can also edit information
directly
in the table by selecting the cell containing the information and then
edit. The last method could be a bit inconvenient, is not recommended
and
should be avoided where possible.
Note:
Edits that are made directly in the
table
cell are not saved to the database until you have moved to a different
record (another row) or exit from the program.
How
to Delete records from the table
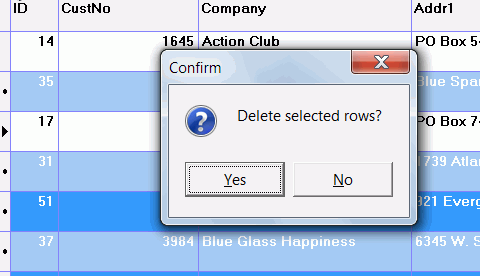
1. Select the row
containing the record.
2. To delete multiple rows, press Ctrl key while you select
the rows.
3. Click the "Delete" button. You will be prompted for
confirmation. Choose "Ok"or "Yes",
if you are certain you want to delete the selected records, otherwise
click "No"
or "Cancel" to abort the process.
4. To delete all records in the table, from the main menu or context
menu click "Delete All". All
records in the table will be deleted, i.e the table will be emptied.
Caution
When you empty a table, all records in the table are gone forever. The
process is not reversible.
How
to Export/Print records as table to office programs or as Labels
Label Mix uses flexible
approach, which
enables you to export records from tables directly to your office
programs for further manipulation (including printing)
OR generate labels for the data and
export them as images or/and printout.
I. Exporting table records to your
office programs (Text, Word, Excel, RTF, HTML)
From
My DataBase section of
the program
you can export and
save data into files of various formats such as:
- HTML
- MS
Word
- MS
Excel
- Plain
Text
- Rich
Text
- Comma-separated
Text
- Tab-separated
Text
- Data
Interchange Format
- SYLK
Format
|

(a)
|
(b)
|
(c)
|
To export master table
content as single
table to your office programs, do the following:
1. From "My Database"
section
workspace, select the table. If necessary, carry out operations such as
search, sort, edit, delete etc.
2. Use the
Columns viewer (editor)
to specify the
columns, their appearance order and width - the way you want them
appear
in resulting table.
3. Adjust
the columns width
such that information
in the columns is visible
4. Invoke
the "Data
Export Manager"
dialog by clicking "Export / Print ..."
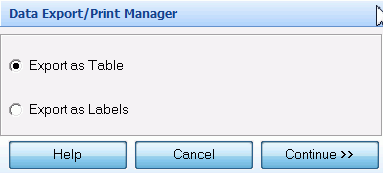
5. Select "Export as
Table"
and then click "Continue >>"
6. You will
be prompted to
confirm the
table's present state as it will appear in the resulting table after
export.
Click "Ok". If you click "Cancel", you will be taken
back
to step 2.
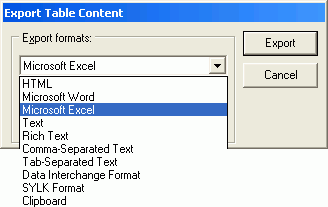
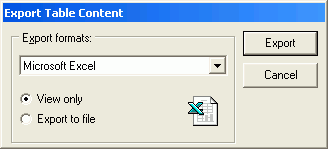
7. Choose
the export format
from the drop-down
list
8. Choose
"view only" if you want the table to be exported
directly into the corresponding client
program,
otherwise choose
"export to file" to export and save the table
content
to file. In "
view only" mode,
Label Mix
invokes (automatically
opens) the corresponding client program and export the table directly
into
the program. In
"export to file" mode
Label Mix will
prompt you to give a name to the file into which the table content will
exported and saved
Note:
You can also export the
table's content
to Clipboard and later paste into any other file. In step 6 above,
choose "Clipboard"


II. Exporting table records as Labels
To export table records as labels for printing or/and saving as
images do the following:
1. Follow
steps 1-4 as described above.
2. In the dialog box, select
"Export as Labels"
and then click
"Continue >>". The label designer window
(tab) will be activated with a new label design created.
3. In the
Label Properties
editor (database tab), connect the table to the label designer by
checking the
Database checkbox
and then selecting the table from the list of available tables. see also:
Tables and Label Objects
4. Set other
properties of the label including
layout,
size, paper size, background, printing options etc. Close the editor.
5. Design and render your label(s) as described in
Creating a New Label
Other display properties of table you can set at run-time are
accessible via table properties bar, located immediately above the
table.

Option name
|
Default Value
|
Description
|
1. Graphic Field
2. Memo Field
3. Title Height
4. Title Gradient
5. Row Height
6. Word Wrap
|
1. Full (yes).
2. Full (yes).
3. 25pt.
4. No.
5. 70pt.
6. Checked (yes)
|
1. imgs/Picture (if exists in the record data) may be or
not displayed for the record in the table. Possible values*
2. Memo (if exists in the record data) will be displayed for the record
in the table.
3. Height
of the table title.
4. If
you want to use gradient color for the title background
5. Height
of the table rows
6. Display
content as multi-line text if characters count is more than column
width. If wrap is No (unchecked),
ellipsis will be
displayed when text doesn't fit width of column |
Additional options for Background color, Text font color, Text font
size, Active cell color, Column title background color, Column title
text font color, Column title text font size can be accessed via options
and preferences page.

