General help topics on using
FadOffice : Online Contact Manager, Company List Directory, Task Planner, Mailing List Manager, Creating Web Forms, Mailing Address Labels generator,
Exporting records to Excel, CSV and PDF.
Topic 1 : User Interface

By functionality and usage frequency, FadOffice User interface can be divided into two logical sections:
1. Settings & Preferences. The section where you manage your settings and preference such as date format, time zone, user interface style and color scheme. The section
also includes your personal data such as name, address etc., system notifications. In most case, you only need
to specify the necessary parameters once, save them for your account and you're set. You don't visit this section often.
2. The workspace. This is the area where you'll be spending most of your time within the system.
It includes managing of records, browing, searching etc. For example, your contacts or daily task planner.
By using the navigation toolbar (menu) at the top of the page, you can switch from one section to the other
at any time.
Regardless of the section, at the bottom part of every page are located documented help and guidelines tabs with short description of the purpose and how to use the functionalities available on
the particular page.

System interface display styles
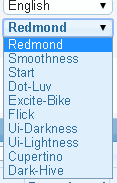
The system interface is skinnable, dynamically. You can change the style (theme) to any of the 10 available in the
system. Simply select your preferred style, from light-shaded Flick to very Dark-Hive.
Selected theme will be automatically saved and the page will be re-loaded with your latest choice. Default theme is Redmond.
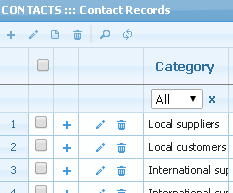
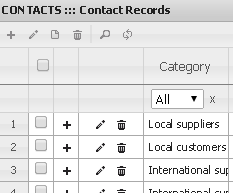
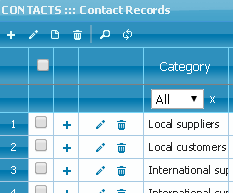
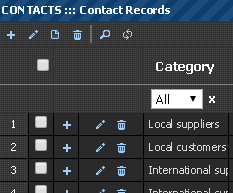
Theme selector is located at the top-right angle of the page. Below screenshots are few examples of themes available.
Play with the rest to arrive at your preference. You can switch between themes at any time, on-the-fly.
Topic 2 : Table (List view, Grid)
Records may be displayed in three different formats:
- 1. Tables (List views, Grids)
- 2. Forms
- 3. Graphs (meta-data)
Table (List view, Grid) - renders information in a simple tabular method. The column headers are loosely presented, that is, they are not presented under any logical sequences.
Tables (or grids) are equipped with navigation toolbar with action icons, located at the bottom and/or top of the table. Additionally, for some frequently-used functions (or crude operations), action icons may be located inside the table.

Using Table (List view, Grid), you can:
- Add, Edit, Delete records - by using corresponding action icons or directly in the table
- Browse records - by using the horizontal and vertical scrollbars - left-right, up-down
- Filter (search) records by columns (toolbar filter)
- Carry out complex search with multiple combinations of criteria - by invoking and using the search form
- Paginate records - by dividing number of records to display into several portions and browsing them page-by-page
- Sort records in alpha-numerical order - by clicking the necessary column title (header)
- View each record in separate form - by selecting and double-clicking the record
- Re-arrange the table columns - by dragging and dropping them to the necessary positions
- Hide/Show the table columns - by using column chooser to select/unselect the columns to show/hide
- Resize the table column width - by dragging the column header right boarder left-right or vice-versa.
- Export(save) records to files on your system - currently only to Excel, PDF or CSV formats are supported.
navigation toolbar with action icons description (left to right)

| Alert icon
|
Invokes full-page advanced form for data manipulation. If a record is selected when the icon is clicked, then the
resultung form will be populated with the record data, ready for editing.
If no record selected and the icon is clicked, then the new form can only be used to input (add)
new record
|
|
Plus icon
|
Invokes a modal pop-up dialog form on the current page for adding new record to the database.
|
|
Pencil icon
|
Used for editing the selected record either inline (within the table) or
via modal pop-up dialog form on the current page.
|
|
Trash icon
|
Deletes the selected record. Deleted record can not be recovered!
|
|
Search icon
|
Opens a modal pop-up search form (dialog) for using multiple criteria to find records in the database, to be displayed in the current table.
|
|
Refresh icon
|
Update content/state of the current table to display latest changes (if any).
|
|
Newwin icon
|
Export (save) records from current table to Excel file on your system.
|
|
Print icon
|
Export (save) records from current table to PDF file on your system.
|
|
Document icon
|
Export (save) records from current table to CSV file on your system.
|
Hints:
 All action icons come with tool tips (a small rectangular pop-up window with brief description of the icon). Hover your
mouse over the icon for a moment, and the tip will pop-up.
Master-Detail View
Master-Detail View data presentation involves two or several tables on a single page. As a rule,
such tables are linked to each other by relationship called Master-Detail.
For example, Main contact records are displayed in the topmost table, with detailed (attached, linked, miscellaneous, custom fields) information shown in other tables below the main table.
Master-Detail View data presentation format is advanced way of displaying data retrieved from different tables, linked together
by Master-Detail ("parent-children") relationship.
The Master data is displayed in the top table while the Detail records at the bottom table.
When you select a record in the Master table, all connected details are automatically displayed in the Detail table(s).
One example is a contact record having multiple telephone numbers, multiple emails, multiple adresses etc. The system will link the contact main record (Master)
with the corresponding Detail data taken from various tables - in this example, multiple telephone numbers, multiple emails, multiple adresses etc.
On clicked, most action icons of Table (List view, Grid) will activate
modal pop-up dialog form, which assists in carrying out the operation the action icon is meant for. A good example is the search action icon that fires the search form.
Other uses of modal windows may include:
- Drawing attention to vital pieces of information, e.g. Error warnings
- Blocking the application flow until information required to continue is entered
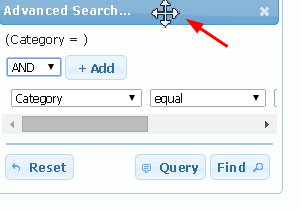
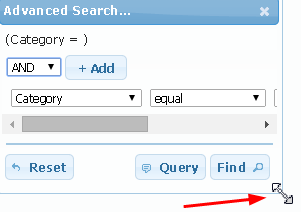
For users' convenience, modal pop-up dialog forms are moveable and resizable by drag-and-drop method. You can move them to the necessary position on the screen
or/and increase their width and height.
|
moving the dialog form
|
resizing the dialog form
|
|
|
Moving (re-positioning):
- Focus (hover) your mouse (or pointing device) on the panel header (title) until your pointing device cursor changes to "Move Cursor"
- Left-click (press) your mouse button.
- Holding down the mouse button pressed, drag-and-drop the form to necessary position - left, right, up or down
- Release your mouse button
Resizing:
- Focus (hover) your mouse (or pointing device) at the lower right of the panel until your pointing device cursor changes to "nwResize Cursor ()"
- Left-click (press) your mouse button.
- Holding down the mouse button pressed, drag the cursor to increase or decrease the form size.
- Release your mouse button
Notes
- A mouse cursor can be a basic image or an animated image.
- Some programs/browsers may use their own mouse cursors, hence
the steps above only refers the Windows standard cursors and not the non-standard cursors that may be used used in third-party programs or games.
Topic 3 : Add, Edit, Delete Records - the basics
Generally, data manipulation is carried out within the Table (List view, Grid)
used for displaying the data. This is the basic concept and convenient for most users, exceptions being situations
as described elsewhere in other sections, e.g see Using Forms to Manage Records.
Unless otherwise specified, the Table (List view, Grid) accomodates three separate action icons for
adding, editing and deleting records. Namely, left to right,
 Plus icon, Pencil icon and Trash icon respectively. Note that the first action icon (Alert icon) can be used both for Adding or/and Editing
record in Advanced Form mode - see managing company records in 3 diffrent ways below.
Also note that the action icons can be located either on the navigation toolbar at the bottom or top of the Table (List view, Grid) or
directly inside the Table (List view, Grid) itselft, at the extreme left. In the latter case, clicking the icon will result in what is called
inline mode of operation, i.e. you can add or edit record directly inside the table. In the former case, clicking the icon
will result in a modal window with form popping-up out of the table.
Adding New Record (pop-up form)
- To add a new record, click the Plus icon. A dialog window with a form will pop-up
- Fill-in necessary information. Some input boxes may be marked with *, meaning they are required
- If the field is of lookup type, select the necessary value in the drop-down choice list
- Enter other required information (for example, background color, text font color etc. - for task and schedules categrories).
- When done, click Submit button to save the new record to the database
Editing Record (inline)
- Mark (select, check) the record to edit
- Click on the Pencil (edit) icon. The row will be highlighted and switched to edit state.
Also note that in edit state, the Pencil (edit) icon changes to Disk (save) icon, while the Trash (delete) icon is replaced with Cancel icon.
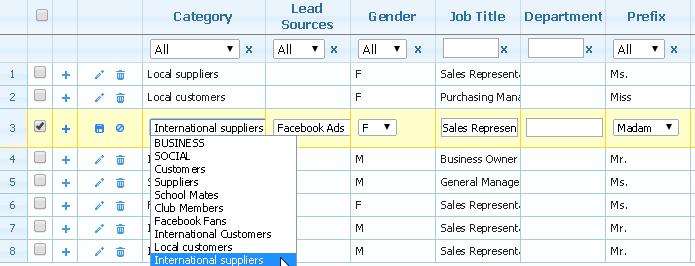
- Edit the record as necessary.
- When done, click the Disk (save) icon to save changes
- To discard changes, instead of the Disk, click the Cancel icon
Editing Record (pop-up form)
- To edit record using the pop-up form, select the record and then click the Pencil (edit) icon on the navigation toolbar (outside the table)
- In the resulting form carry out all editing operations.
- When done, click Submit button to save changes
- To discard changes, instead of the Submit, click the Cancel button
Deleting Record
- Select the record.
- Click the Trash (delete) icon (from within or outside the table)
- Click Delete button on the warning dialog to confirm your action
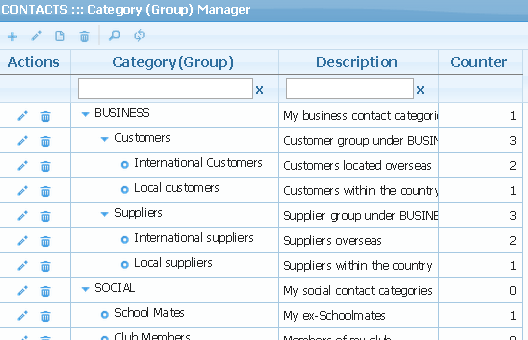
For lookups such as Company groups, Contact groups and Lead sources,
you should manage lookup values directly in the respective section, presented in form of treeview:
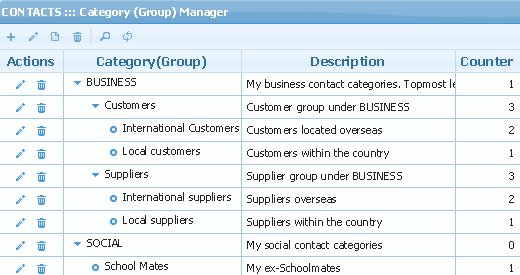
- Select the necessary node (record)
- Click the required action icon - add, edit or delete
- If you are adding a new group, then it will be created under the selected
group (record), i.e. the selected group becomes the parent, and the newly created
group (record) - the child or subgroup
- If you delete the parent group, then all children or subgroups under it are also deleted. So, take
caution.
Notes
- After you've added, edited or deleted a record, you may need to click the Refresh icon to see the latest changes.
- Before deleting item from lookup tables, e.g. Category (group), make sure there are:
a) NO SUB-CATEGORIES or SUB-SUB-CATEGORIES are under the particular Category (group)
b) NO RECORD(s) has been attached (linked) to the particular Category (group) from elsewhere in the database.
First remove or transfer all records sharing the Category (group) to another Category (group).
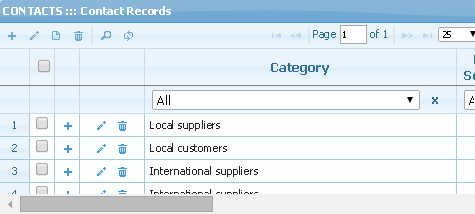
- For your convenience, the counter field (column), in the screenshot above, indicates the number of records attacched (linked) to a
particular lookup record - in this case, Category (group).
Each time you add, edit or delete record(s) from other sections of the system, counter value is automatically
updated.
Notes

- URL / Website field will be processed as clickable link once you observe the "http://www" format for links
- E-Mail Address field will be processed as clickable link once you observe the "@" format for emails
- For date-time fields, you may use the date-time picker or/and enter the date/time value manually
Topic 4 : Lookup tables (categories, name prefixes, lead sources , countries etc.)
Why use lookups?
Lookup is a predefined list of values, that a record can
inherit from another source of records. Lookups ease your work, acting as "helpers", and are used when adding or
editing major record entries.
For example, consider a situation where you have 20 contacts to add
to your database. All these contacts are located in one city, and in one
country. Each of the contacts has 3 telephone numbers for different purposes
- home, office, fax, cell. Further, these 20 contacts work in one company, so they belong to business contacts group or category.
The old traditional way of adding information about these contacts to
the database would have been: create a Table and add one record each for
all the 20 contacts, repeating the city name, country name and also making
remarks for telephone types (home, office, cell, fax) for every record!
That is not all. You must also add the company name, address, telephone
numbers, type of business activities, etc to each contact's record. Manually.
20 times! The process could be time-consuming and, worse still, unproductive.
This is where lookups come in.
Lookup enables you to enter once, in a separate table, any repeating
information in the database and use it each time you have occurrence
of such information in other tables. In unlimited number of times and tables.
In the example above, all we need do is create five different "helper" tables
- lookup tables. In the first "helper" table we will add city names, second table
will be for countries, third table will contain information about the telephone
types, fouth for the group, and the last fifth table - company information with address, telephone, fax etc. Each record entry
in its lookup table must have at least a name and a unique identification
number (ID), automatically assigned to the record by the system, so we
do not have to worry at all about this. Nor do you need worry about creating the tables. The system will take
care of that. Your only task is to fill-in information into the tables and save the changes.
Now, let us go back to our CONTACTS table. It must have been linked
to the lookup tables by the system, in such a way that instead of manually entering information
(city, country, telephone types, group and company, in this example) repeatedly
for each of the contacts, all we do is select the information from the
appropriate lookup table, shown to us in form of choice list. You will
not see or notice the entire process, but each time we choose a name or
item from the list, what we are actually doing is this: we are telling
the system to select corresponding unique identification number(s) for
the name from the lookup table(s), add and save them to the Contacts (main) table.
From that moment, the system will use these numbers (IDs) to locate in
the lookup tables and show us the actual names (text value) in the main table.
Another advantage of using lookups is that in future if any of the lookup
values, for example company name, changes, all you need to do is
edit the value in the lookup table only once. The new value will
be automatically applied to all the 20 or more contacts concerned.
You will also find lookups such as Lead sources invaluable when in future you want
to analyze the channel(s) your contacts are using to find you.
Hints:
1. Other known definitions of lookup table are: cross-reference table,
bridge table, join table, map table, intersection table, link table.
2. Countries, Gender, name Prefixes lookup tables are system defaults, so you can neither edit nor
delete records from them. Other lookups you must create and manage.
For lookups such as Company groups, Contact groups and Lead sources,
you should manage lookup values directly in the respective section, presented in form of treeview:
- Select the necessary node (record)
- Click the required action icon - add, edit or delete
- If you are adding a new group, then it will be created under the selected
group (record), i.e. the selected group becomes the parent, and the newly created
group (record) - the child or subgroup
- If you delete the parent group, then all children or subgroups under it are also deleted. So, take
caution.
Topic 5 : Using Forms to Manage Records
Generally, data manipulation is carried out within the Table (List view, Grid)
used for displaying the data. This is the basic concept and convenient for most users. However,
there are situations whereby special forms have been developed and applied for extended/advanced functionalities.
One of such situations is when generating webforms for your website to capture visitors' data they will submit
directly to your database on the system - for more details, see the section on automatic webform generator.
Another example - Advanced Form for adding/editing company information (COMPANIES section of the system).
The form pulls data from 16 different tables, establishes relationships/links among them. Further,
- using the form's Contacts Linker tab, you can attach multiple Contacts from your database to a single company (if they work in the same organization)
- inherit/share all communication info (telephone, fax etc.) of the company among the contacts
- create unlimited number of custom fields to store non-standard information.
After you have filled and submitted the form, it fires instructions to initiate connection to the database, locate and update records
in the tables as needed.
Simply put, the form performs a complex task, far beyond the capabilities of
any single table in the system.
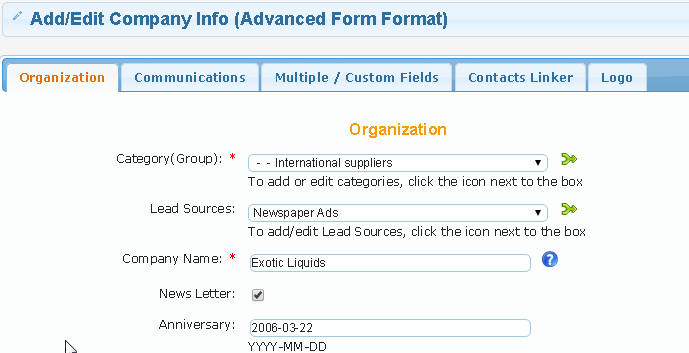
Same narrative holds true for Advanced Form format option for manipulating contacts data in the database.
Advanced Form format option is elaborated form for adding/editing contact information. Using the form, you can add not only basic contact information, but also
extensive information such as multiple telephones, multiple emails, multiple adresses etc. For example, Home telephone, Work telephone, mobile or/and Emergency telephone
numbers. The form also enables you to create unlimited number of custom fields to store such information.
Notes
- If you're interested in adding only basic contact information then it is recommended that you stick to the shorter and simpler method
provided by the Table (List view, Grid)
- Advanced Form for adding/editing contact info is accessible through the CONTACTS block.
- To invoke the form for adding new record, simply click on the Advanced Form link.
- To edit a record using the advanced form, first select the record from the main table and then click the alert icon (first from left)
among the navigation icons. If no record is selected and you click the icon, the form will default to adding new record.

Topic 6 : Browsing Records
Browsing Records
- Browse the records using your browser Up - Down, Left - Right navigation buttons or your computer keyboards.
- Browse the records using the navigation buttons below and above the table: First page, Last Page, Previous Record, Next Record.
- Set the number of records you want displyed per page: 25, 50, 75 or 100.
- To sort the records in alpha-numerical, descending/ascending order, double-click on the necessary column title (header).
- You can also view each record in seperate page by selecting and double-clicking the row (the record) OR just click the View icon. A form will pop-up with the record details published.
- You can select multiple records by checking the necessary boxes one-by-one.
- To select ALL records, click(check) the topmost box of the first column - the "Select/Unselect All" checkbox.
Topic 7 : How to Search for Records
As you add more and more records to the database, there comes a time when you
will need only a portion of the records meeting certain conditions. It can be your contacts in a particular city/country,
or tasks list for a particular day. This is when you turn to the search mechanism of the system.
FadOffice provides two distinct types of search tools, namely:
- 1. Toolbar Filtering
- 2. Complex Filtering or Advanced Search
Toolbar Filtering entails entering your search term(s) in the input boxe(s) immediately below the necessary column headers
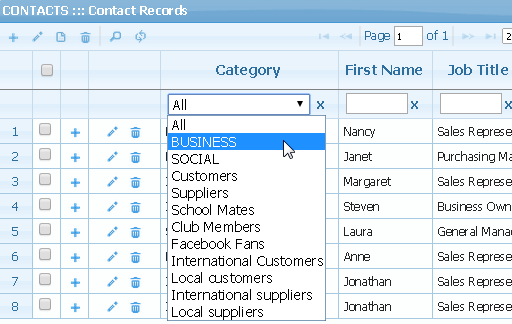
and then hitting the "Enter" key. If the column is a lookup field, then a drop-down choice list (select) box will
be displayed, if a date-time field - an interactive date-time picker.
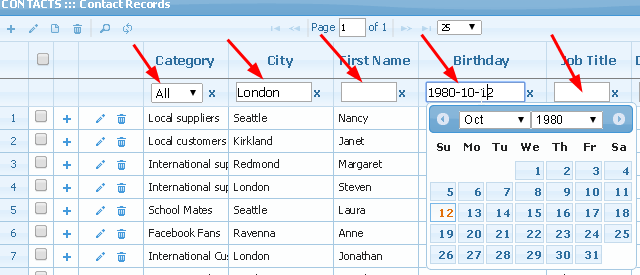
- Enter the word(s) in the box immediately below the necessary column header (title) and then click "Enter".
- You can filter records using fragments of information or complete words..
- If nothing is found, please, try to search for plural forms of the requested information.
- To clear the search form and all prior results, click on the Refresh / Reset button.
Toolbar Filtering can be used either solely or in combination with Complex Filtering.
Complex Filtering or Advanced Search mechanism
enables you to carry out search on single or multiple columns (fields) using various search criteria.
In Complex Filtering or Advanced Search mode, you can combine several columns (fields) and give each column the criterion (condition)
it should meet for your search.

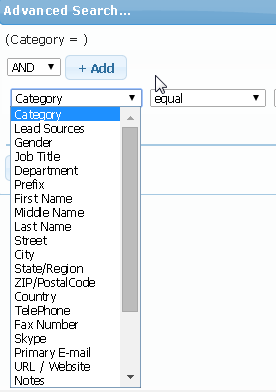
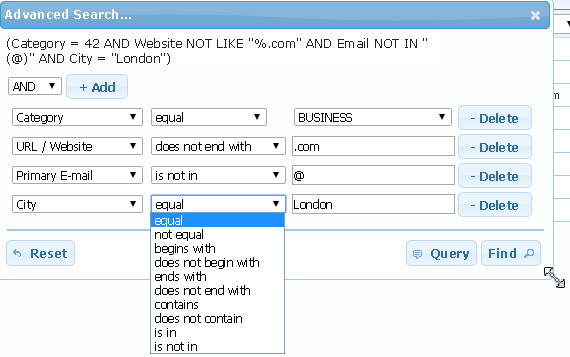
Available search criteria include:
a) equal ( = );
b) not equal ( <> );
c) less ( < );
d) less or equal ( <= );
e) greater ( > );
f) greater or equal ( >= );
g) begins with ( like%);
h) does not begin with ( NOT like% );
Other possible conditions that you may use for your search are: 'is in', 'is not in', 'ends with', 'does not end with', 'contains', 'does not contain'.
- To initiate Advanced Search mode, click Reset to erase all previous search conditions and bring back the table to its initial state, and then click the Search icon on the Navigation Tools Panel. The Advanced Search Box will pup-up.
- Select All or Any.
 . All - same as AND, meaning the search must match ALL the criteria you specify for all columns. Any - same as OR, meaning the search matches the criteria you specify for any one of the columns.
- Click on the plus (+) button to add search elements to the form.
- Select the column (field) you want to search.
- Set the search criterion (condition) for the column.
- Enter the search string (text, number or figure) for the column.
- You can combine multiple columns and give each column the criterion (condition) your search should meet for the column
- If you want to search multiple columns, then repeat the four steps (1-4) above
- To remove a column from your search, click the minus (-) button
 , located at the end of the search string input box
- Click Find
- To erase all search conditions, Click Clear/Reset
After you have used Complex Filtering or Advanced Search method to retrieve the main records you want, you MAY additionaly apply Toolbar Filtering to further limit the data displayed in the table.
In conclusion, here are the steps invloved:
- Invoke the search tools to retrieve from the database the records you want.
- If marching records are found, your search result will be displayed in the table.
- Carry out additional searches if necessary, invoke other actions to suite your specific needs.
- Customize the list view, hide/show, resize the columns, sort the records, set amount of data to display per page.
- If necessary, export(save) the records to file on your computer.
Notes
- Technically, you can retrieve millions of records from database, but your browser/devices will NOT be able to handle/process nor display so much. You can search the database as many times as you wish, with different search terms and conditions.
However, 5000 is the maximum number of records you can retrieve/display/export at a time for every search. This is the optimal number for most browsers.
- Generally, focused searches are advisable. Set your search criteria on the date field (with pop-up) calender to narrow the date range, for example, and also be specific with
Names, Address, Country etc.. You can can add other search conditions, though. The more conditions you add for your search criteria,
the more accurate result you get, the less amount of records retrieve from the database.
Topic 9 : How to Re-arrange table columns display order
By default, the Table (List view, Grid) display data in a simple tabular method.
The column headers are loosely presented, that is, they are not grouped under any logical sequences.
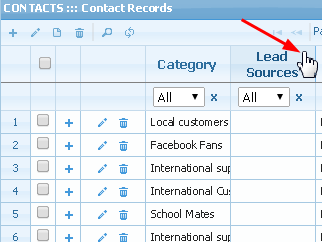
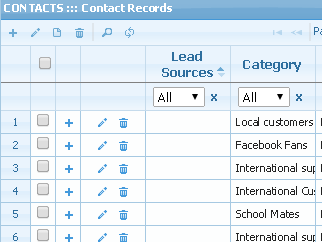
You may find it necessary to re-arrange the table columns. Use drag-and-drop method to achieve this.
- Focus (hover) your mouse (or pointing device) cursor on the column header (title) until your pointing device cursor changes to "Hand Point Cursor"
- Left-click (press) your mouse button.
- Holding down the mouse button pressed, drag-and-drop the column header (title) to necessary position - left or right
- Release your mouse button
Notes
- A mouse cursor can be a basic image or an animated image.
- Some programs/browsers may use their own mouse cursors, hence
the steps above only refers the Windows standard cursors and not the non-standard cursors that may be used used in third-party programs or games.
|
table column order before re-arrange
|
table column order after re-arrange
|
|
|
Another option is to invoke and use the special Column Chooser
Topic 10 : How to Hide/Show Table Columns
You can limit the number of table columns to display by hiding/showing them.
- Click the Column View icon to bring up the column chooser dialog
- Select the columns you want hidden/displayed and then Click the "+" or "-" icon respecitvely.
- Columns with are the ones to be displayed, while columns with "+" will be hidden.
- Click the OK button.
- Alterntively, click the Remove All or Add All link to hide or display respectively all the columns.
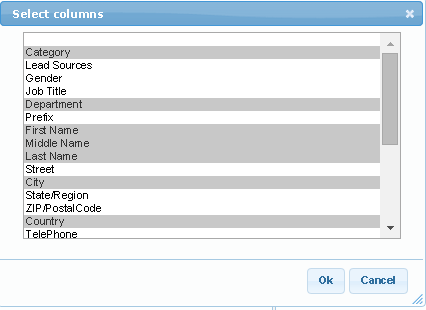
Another way you can use to hide/show columns is by holding down the CTRL key while you use your mouse to select/de-select the columns in the box.
To select/de-select all columns, hold down the SHIFT key then use your mouse to select the first and last column on the list.
Topic 11 : How to Resize Table Column Width
Table columns are resizable, i.e you can adjust the width.
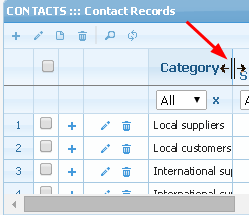
- Focus (hover) your mouse (or pointing device) cursor on the border line between the column headers (titles) until your pointing device cursor changes to "Vertical Split Cursor (SplitVCursor, ColResize)"
- Left-click (press) your mouse button.
- Holding down the mouse button pressed, drag the border line to necessary position, to increase or decrease table column width. Left - decrease, Right - increase column width.
- Release your mouse button
Notes
- A mouse cursor can be a basic image or an animated image.
- Some programs/browsers may use their own mouse cursors, hence
the steps above only refers the Windows standard cursors and not the non-standard cursors that may be used used in third-party programs or games.
|
column width before resize
|
column width after resize
|
|
|
Topic 12 : Mailing Address Labels Generator
Mailing Address Labels Generator processes records in an easy way to export the data in form of labels with recipient addreses - contacts, organizations or both.
Address Labels can be saved to file, printed and used as stickers for envelopes. This may be useful if you want to send business offers, product catalogs etc.
to the postal addresses.
Address Labels uses advanced mail-merge functions of FadOffice system.
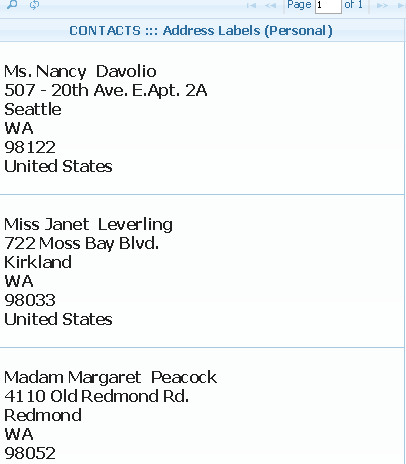
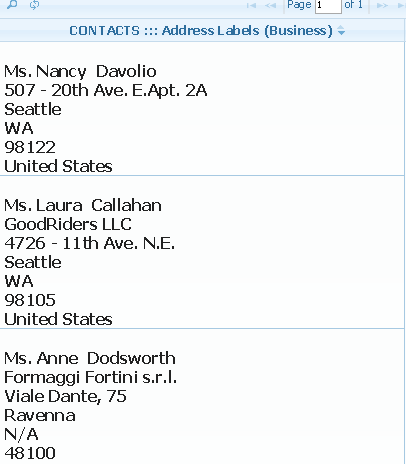
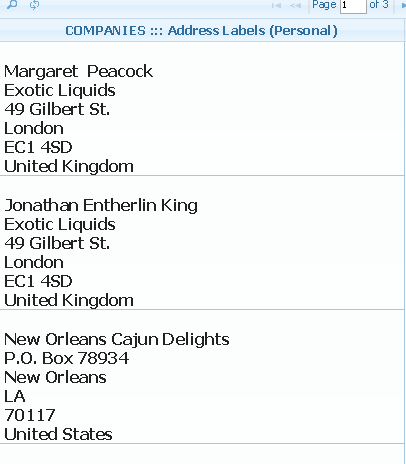
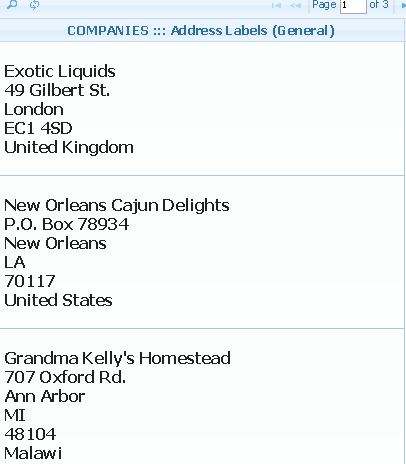
Contact Name*, Company Name, Postal Code (ZIP), Region, City, Street, House No., Address, Country are processed not as columns,
but as lines to form a single block called address label.
Thus,
Line 1: Contact Name (if available)
Line 2: Company Name
Line 3: Street, House No.
Line 4: City
Line 5: Region (district)
Line 6: Postal Code (ZIP)
Line 7: Country
Address Labels are generated from CONTACTS or/and COMPANIES data sources and can take several forms:
Under the CONTACTS block we have:
- 1. Address Labels (Personal) - personalized, with Contact name, but without Company name;
- 2. Address Labels (Business) - personalized, with Contact name and with Company Name (if available).
Under the COMPANIES block we have:
- 1. Address Labels (Personal) - personalized, with Contact name (if available) and Company name. Address is Company Mailing address;
- 2. Address Labels (General) - general, without Contact name, but with company name. Address is Company Mailing address
| Address Labels under the CONTACTS block |
|
|
Address Labels under the COMPANIES block |
|
|
As usual, apart from browsing the records, you can filter(search) using the search form, carry out complex search with multiple combinations of criteria, sort the addresses in alpha-numerical order, view them in separate forms.
Lastly, you can export(save) the labels as Excel, PDF files to your system.
Notes
- Depending on the version of your browser, export/save functions may not work as described. Same goes for some old versions of office programs.
- Particularly, some versions of Microsoft Excel have proved to "mal-function" with address labels. If you experience this,
then we'll suggest that in place of Excel you download and use OpenOffice, which we have tested and has proved to handle
the address labels as expected - WYSIWYG (What-You-See-Is-What-You-Get). OpenOffice is a freeware program.
Topic 13 : How to Export(save) Records/Reports to File
FadOffice comes with advanced Reporting system. From exporting "raw" simple table list to complex Mailing Address Labels,
the system offers three possible reporting file format options - Excel, PDF or CSV.

- After searching, setting the visible columns, you can proceed to export/save the records to your system for further manipulations.
- To export/save records to external files click "Excel, PDF or CVS" icon
- Follow the instruction that will appear on your screen
Notes
- Depending on the version of your browser, export/save functions may not work as described. Same goes for some old versions of office programs.
- Particularly, some versions of Microsoft Excel have proved to "mal-function" with address labels. If you experience this,
then we'll suggest that in place of Excel you download and use OpenOffice, which we have tested and has proved to handle
the address labels as expected - WYSIWYG (What-You-See-Is-What-You-Get). OpenOffice is a freeware program.
How to use: Click the content menu at the
top-right corner of the page to open the topics and then select the necessary item on the list.
All Examples are static with screenshots. To see live examples of the topics discussed, you must log-in to your account on the system. Creating user account is free.
▲ Top






 . All - same as AND, meaning the search must match ALL the criteria you specify for all columns. Any - same as OR, meaning the search matches the criteria you specify for any one of the columns.
 , located at the end of the search string input box


